Wednesday, August 3, 2016

Slime Bubbles Science Project


What You Need:
  • 5 oz. bottle of Elmer’s clear school glue 
  • Food coloring
  • Liquid Starch (about ½ cup) 
  • Bowl 
  • Spoon 
  • Straw (hard plastic straws that come with reusable cups are easiest to use) 
  • Paper towels for cleaning up
What You Do: 

1. Pour the whole bottle of glue into a bowl and mix in a few drops of food coloring (we used 3 drops of green).


2. Pour a small amount of liquid starch into the colored glue and mix it thoroughly. It will begin to form a clump.


3. Add a little more starch and stir it in well. Continue adding starch and mixing with the spoon until you can’t stir it anymore, then it’s time for the fun part: use your hands!


4. Add more starch and knead it into the mixture. It will feel slimy and may still stick to your hands. Try to scrape as much of the mixture out of the bowl and
5. Off the spoon and your hands as you can, then mix it in. As you knead it, it will begin to dry off a little.


6. Stretch the slime with one hand and watch what happens. If it’s really stretchy, it’s a great slime that is a lot of fun to play with. Separate it into two parts and set one back in the bowl. Add a little more starch to the other part and continue kneading and mixing (it may separate into strands, but keep squishing and it will come back together). When you stretch it, does it break off? If not, keep adding a little starch at a time.


7. Once your slime is stiff enough, pull of a bouncy-ball sized piece, make it into a ball, and stick a straw into it. Press the slime around the straw and hold it firmly so no air can escape, then slowly blow through the open end of the straw. This may take some practice, but you should be able to get a decent bubble!


8. When you’re finished, use paper towels to wipe the extra bits of slime off of your dishes before washing them in the sink. Store your slime in a ziploc bag when not in use (it should keep well for a week or two). Wash your hands after touching the slime. 

What Happened:

Slime is a polymer, which is a long chain of molecules that gives it stretch and flexibility. Glue is also a polymer, so why doesn't it behave the same way as this slime? Well, when you added starch to the glue, it caused the glue molecules to link together in a way that made them flexible and more solid than liquid. This is called cross-linking. Cross-linked molecules are bigger and less liquid-like than regular polymers. The chains of polymers already in the glue were linked together by the starch molecules, making them less fluid and more stretchy!

Source: Slime Bubbles

Easy Homemade DIY Snow Globe


Kids of all ages, the young and the young at heart, appreciate the appeal of a snow globe. And even young kids are capable of mastering this easy DIY snow globe.

What You Need:

  • Small glass jar with tight fitting lid
  • Hot glue gun or super glue
  • Distilled water
  • Liquid glycerin or light corn syrup
  • Fake snow or glitter (find at craft stores)
  • Small plastic trees, animals, houses, or other decorations
Adult supervision is needed!


What You Do:
1. With a grown-up's help, use the superglue or hot glue to affix your trees or other decorative items to the inside of the lid. Let dry.
2. Fill jar about 3/4 full of water (or about 1/2 if using corn syrup).
3. Put a few pinches of glitter or fake snow in the jar.
4. Screw the lid on very tightly.
5. Turn your jar upside-down and watch the snow fall inside your homemade DIY snow globe.
6. Now add several drops of liquid glycerin (or an equal amount of corn syrup) making sure you leave room for air at the top. Repeat step 5.
7. Finally, if you like, you may decorate the base (lid) of your snow globe with ribbon, fabric, or pretty paper.

What Happened:

Have you ever noticed how sometimes objects of the same size weigh different amounts? That's because of density. We figure out an object's density by comparing its mass to its volume. Mass refers to the amount of matter that makes up an object. Volume refers to the amount of space an object occupies. Compare a rock and a marshmallow that are the same size (having equal volume), which is heavier? The rock is, because it has more mass. That means the rock has greater density than the marshmallow because it has more mass (amount of matter) in the same volume (occupied space).

Liquids have density, too. The more dense a liquid is, the easier it is for an object to float on. Glycerin (or corn syrup) is more dense than water; so after we added it to the snow globe, the snow fell more slowly. Try adding a few more drops of glycerin (or corn syrup). What did you notice? You should have found that the more glycerin (or corn syrup) you add, the slower the snow falls. Learn more about liquid density with these projects.

Source: Snow Globe

Saltwater Circuit


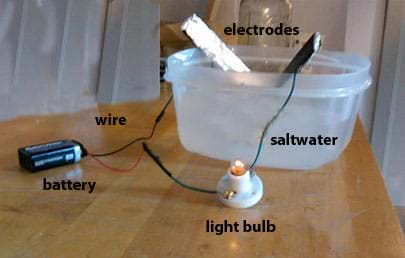
Did you know that you can use salt water to make a light bulb shine? It sounds crazy, but it's true! This is because salt water is a good conductor of electricity.

Salt molecules are made of sodium ions and chlorine ions. (An ion is an atom that has an electrical charge because it has either gained or lost an electron.) When you put salt in water, the water molecules pull the sodium and chlorine ions apart so they are floating freely. These ions are what carry electricity through water. Watch it work in this project! 


(Adult supervision recommended.)

What You Need:
  • Cup or beaker
  • Masking tape
  • Water
  • Insulated copper wire
  • Salt
  • 9-volt battery
  • Aluminum foil
  • 3.7-volt light bulb in socket (or buzzer)
  • Tongue depressors (or popsicle sticks


What You Do:

1. Wrap two tongue depressors in aluminum foil. These will be your electrodes.

2. Cut three 6-inch pieces of insulated copper wire and strip a half-inch of insulation off each end.

3. Connect one end of a wire to the positive terminal of the battery - hold it in place with masking tape. (If you are using a battery cap, connect it to the red wire.) Connect the other end of the wire to the light bulb socket. (Just wrap the wire around the bottom of the bulb, if you don't have a socket. You may have to secure it with tape.)

4. Take the second piece of wire and connect the light bulb socket with one of the electrodes. Use masking tape to stick the bare end of the wire on the aluminum foil near the top the electrode.

5. Use the third piece of wire to connect the negative terminal of the battery with the other electrode.

6. Test out your circuit by touching the two electrodes together. This should complete the circuit and allow electricity to flow from one terminal of the battery to the other, lighting up the light bulb in the process. If the bulb doesn't light up, check your wire connections to make sure they are all secure and then try again.

Testing the circuit in water

1. Pour 1 cup water into a cup or beaker. (If you have distilled water, that will work best.)

2. Put the two electrodes in the cup, but don't let them touch each other. What happens to the light bulb?

3. Remove the electrodes from the cup and then stir in a teaspoon of salt until it dissolves. Put the electrodes in the salt water without touching them together. Watch the light bulb.

The light bulb lit up because the sodium and chorine ions conducted the electricity from one electrode to the other. This completed the circuit, causing the light bulb to shine.

Try adding more salt and see if the light bulb shines brighter. Use a buzzer instead of a light bulb and see if more or less salt in the water makes the buzzer ring louder or softer.

Try this solar distillation project to get fresh water out of salt water and then use your saltwater circuit to test the water you distill! Fresh water won't conduct electricity as well as salt water.


Source: Making Saltwater Circuit

Monday, August 1, 2016

Rainbow Reaction Tube


Amaze your friends by mixing two solutions to make a rainbow! Watch as purple sinks to the bottom and red floats to the top, and they mix together to form every color in between.

What You Need:

  • 10ml graduated cylinder 
  • Universal indicator 
  • Sodium carbonate 
  • Beaker 
  • Distilled white vinegar 
What You Do:
1. Put 15 drops of universal indicator in the graduated cylinder and add filtered water up to the 10 ml mark. The solution should be yellow-green.
2. Add 3 drops of vinegar to the solution in the graduated cylinder, and it should turn red.
3. In a beaker, put two scoops of sodium carbonate and then add about 30 ml of water. Mix together with the stirring rod until the sodium carbonate dissolves. The solution should be clear.
4. To start the reaction, fill one dropper full with sodium carbonate solution. Squeeze the dropper into the graduated cylinder quickly, rather than drop by drop. The clear solution should instantly turn dark purple, and slowly sink to the bottom, swirling around to make the rainbow.
5. Let the contents of the cylinder settle, until you can see each color from bluish-purple to red. To make the rainbow disappear, pour it into an empty beaker, and it should turn yellow or yellowish green.

What Happened:
Universal indicator changes colors to show the pH level of a substance. In this case, when you mixed an acidic solution (vinegar) with a basic one (sodium carbonate), the indicator made a colorful spectrum — from dark blue to red. Interestingly, if you had added the solutions in the opposite order, you would not have seen a rainbow. To get the rainbow effect, another scientific principle is at work—density. The sodium carbonate solution you made is denser than the indicator solution, so it sinks to the bottom. As the sodium carbonate solution makes its way to the bottom, some of its molecules mix with vinegar molecules, making a new solution, which shows up as a color of the pH scale.

If you don't turn the graduated cylinder upside down, the rainbow will last several days. Over time the colors will mix together through the process of diffusion. The molecules of each solution will mix throughout the graduated cylinder, rather than staying concentrated at the top or bottom. Once you mix the acid and base solutions together, the solution will be pH neutral, and look yellow or slightly green.

To make a different kind of rainbow tube, try making this rainbow density column with all household materials.

Source: Rainbow Tube

Friday, July 29, 2016

Acids & Bases: Red Cabbage pH Paper


You can probably tell that some foods are acidic because of how they taste (oranges, for example). In this science project, we'll use the juice from a colorful vegetable to indicate the pH level of different liquids and find out just how acidic or basic they are!
Learn how to use red cabbage to find out if a liquid is an acid or base.

Part 1: Make pH Test Strips

This part of the project requires chopping and cooking. Make sure you have an adult to help before you begin!

What You Need:
  • half a red cabbage 
  • saucepan 
  • colander/strainer 
  • bowl 
  • rimmed baking sheet 
  • paper towels 
  • filter paper or coffee filter
What You Do:
  1. Ask an adult to chop the cabbage into small pieces. Put the pieces in the saucepan and cover with water.
  2. With an adult’s help, heat the pan on the stove until the water begins to boil, then turn the heat to low and let the cabbage simmer for 20 minutes. Stir occasionally.
  3. Let the cooked cabbage cool slightly, then have an adult pour the contents of the pot through the strainer, collecting the purplish cabbage liquid in a bowl.
  4. Discard the cooked cabbage. Make sure to clean up any drips as you go because the cabbage liquid can stain.
  5. Once the liquid is cool enough to touch, place the paper rectangles into the bowl and stir them around for a moment, then allow them to soak for about five minutes or until they have turned blue or purple.
  6. Remove each paper and place it on a cooling rack to dry (put a rimmed baking sheet lined with paper towels under the rack to catch drips). Let the papers dry completely.
  7. Once dry, cut the rectangles into strips about 1/2" wide. Use these test strips for Part 2 of the experiment.
Part 2: Test Liquids for pH

Now for the exciting part of the project—see how different substances change the color of the test strips depending on how acidic or alkaline (basic) they are!

What You Need:
  • test tubes and stand (or small jars) 
  • liquids from around your house to test (see list below) 
  • red cabbage test strips from above 
  • liquid substances to test* 
  • worksheet to track results 
What You Do:
  1. Pour a small amount of each liquid into a separate test tube.
  2. Dip one test strip into each test tube and place it on a paper towel next to that tube. (Use a wooden skewer to pull the strip out if it isn’t long enough to grab with your fingers.)
  3. Watch the test strips and note any changes in color on the paper.
  4. Keep track of your results with this worksheet. You can even tape the test strips into the spaces once they’re dry. Note that the colors will lighten as they dry, so make sure to write down your results before the strips dry!
*Substances to Test (choose at least 6):
  • Lemon juice 
  • Apple juice 
  • Cola or another soda 
  • Coffee or tea 
  • Milk 
  • Vinegar 
  • Baking soda (mix 1 teaspoon with 1 tablespoon of water) 
  • Dish soap or laundry detergent (mix 1 teaspoon with 1 tablespoon of water) 
  • Eggs (whisk the yolks and whites together) 
  • Antacid, such as Tums (crush a tablet with the back of a spoon and dissolve in 1 tablespoon of water)
What Happened:

The pigment that gives red cabbage its color is called anthocyanin. It is also the pigment found in leaves that turn red or purple in the fall. Anthocyanin is a good indicator of acids and bases, as you saw from the changing colors in this experiment. When added to a base, the purplish pigment turns green or yellow and when added to an acid, it changes to pink or red. In something that is neutral (neither an acid nor a base), the paper will remain the same color (or maybe turn a little blue).

Source: Red Cabbage pH Paper